Saturday, July 31, 2010

Baby Nathan is Here!

Hello all:

My post for today is all about my new grandson.  He is so "Handsome" as his sister keeps telling me when I say, "He is beautiful."  Anyway, he arrived on 7/29/10 at 10:39pm eastern time weighing 8lbs 6ozs, 20"long.  He was a big boy.  There were no complications and all went well, and I am Praising God for this awesome miracle.  We are truly  blessed.  And now without further ado, pictures.

Right after delivery! Mom, Dad and baby

Big Sister and Baby!

Daddy, Sister and Baby!

Grammy and Baby!

Papa, Sister and Baby!


Aunt and Baby!
Baby!!!!!!

Cousin (My granddaughter) and Baby with big sister watching!

Big Sister and baby!

Big Sister and Baby!

Baby!!!!! Handsome little boy!

Friday, July 30, 2010

Scrapbook for Baby

Hello to all my friends out there.  I thought I would share with you the scrapbook I made for my daughter for her baby shower.  Some of the pictures are not the best, but I took them quick so I could get it wrapped and to the shower.  Most of the pages are made using my digital studio even though I did use some stickers I purchased and some stamps when needed.  I will try to let you know what is my digital studio and what is not.  The book is a 12 X 12 scrapbook. 

This is the first page and even though I added a few stickers the 8 1/2" X 11 pieces with grey as the background was printed from My Digital Studio!  How cool is that?

This page is the second page and is also an 8 1/2 " X 11 page added to a 12 X 12 page.  Since her main theme was giraffes, I did add some stickers to this page also.  I also stamped the images from the retired SU set "Wild About You."  I hate that set retired.  I still use it quite often.

This is the 3rd page and I again used My digital studio, but I did two 8 1/2 X 11 and put them together at the halfway point.  I also added brads and a ribbon and a few stickers.  The circles for the pictures, in case you cannot read them say, "Sweet little Baby", Tiny Feet and Tiny Hands.  I love to see pictures of a babies hands and feet.  It is just too cute.

This page I used my punches to make the two giraffes.  I cannot remember who I got this idea from, but if you know who put it out there, let me know and I will be glad to give them credit.  But, I did use a few different punches than they did.  The saying at the bottom did come from My Digital Studio.

Here is another where the top part is done in "My Digital Studio, but i used paper from a retired Designer Series Pack and cut out the balloon and horse.  I thought it turned out pretty well and you can add pictures to any place on the sheet.

Again, this is a 12 x 12 with cut pieces added to show where to place the pictures, but only the center is from My Digital Studio.  I also found some more stickers and added to this page.

Same for this one!  I did add some items to a page in my digital studio and then cut them out and added them.  Then again added some stickers that all came together to match these two pages.

You always have to add a Mommy and Me page and this is another 8 1/2" page attached to a chocolate chip 12 x 12 page.  The items at the bottom are cut from a piece of Designer paper and then adhered to the chocolate chip.  I did stamp the giraffe and cut it out and pop dot it to the page.  My daughter could not believe that the ribbon was not real on this, but a part of the digital page.  Looks good doesn't it.

If it has a Mommy page, it needs a Daddy page and this one is also done with the My Digital Studio.  Again printed off a 8 1/2" page and attached to a 12 x 12 page.  Also stamped the giraffes to the bottom to add a little to the page.  Loving this Digital stuff!

I had to do a page for my GD to be a part of this album and so here it is.  Another 8 1/2 x 11 printout and added to a 12 X 12.  I then stamped the side with another retired stamp set "I'm kind of a big deal." 

Always has to be a page for the grandparents, so here it is. 

With this page I decided to use stickers that I had purchased for a bath-time page.  I made shelves and added a place for the picture.  I wish the lighting had been better, but it is a cute page.  To make a few more bubbles I did add some crystal effects to the page and let it dry.  Looks just like the bubbles that come with the stickers.  Now I know that works, I can make them more often.

Of course you always have to have a picture of your baby sleeping.  So here is another 8 1/2 X 11 printed out.  I did use the real ribbon here to separate where I adhered the pages together.  Then used another stamp that is retired to the bottom of the page.

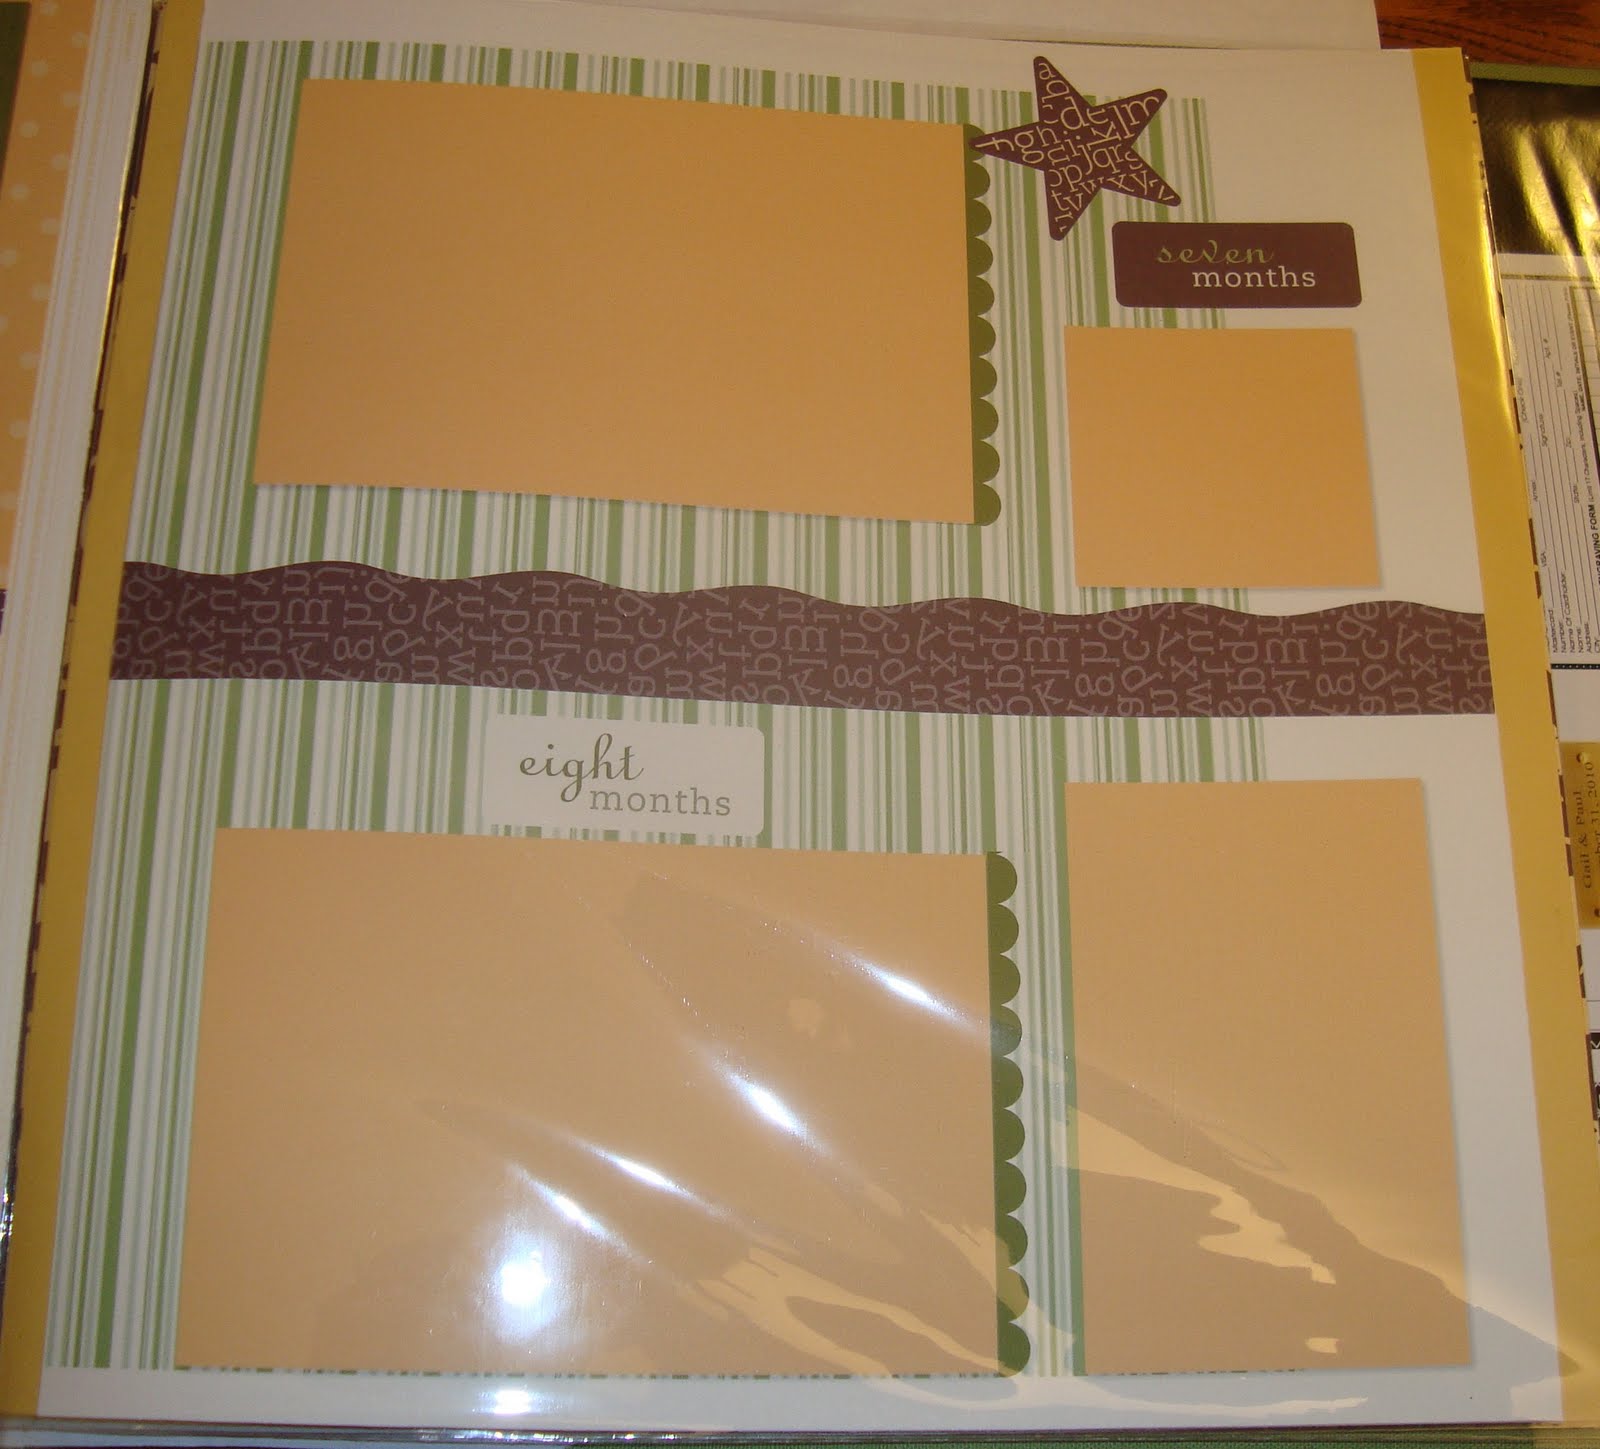
Now here is where I had to be a little creative.  Since my printer does not print 12 X 12 sheets and I need to make the rest of the book by adding 2 months to each page, I made the 8 1/2" x 11" page and stopped it at the 6" mark by using the rulers on the pages.  At that point on the first page I added a border at the halfway mark, so I would know where to trim the page and add the second page I printed.  So you can see below that i still had to attach the two printouts to a 12 X 12, but it turned out so well as long as I left the border on the side at the same level and did not move it.  So on this page I have 1 month and 2 months.

This is 3 month and four month and I basically did the same thing.  You can actually do a mirror image for the second page and then move around as needed.  Makes it a lot quicker.  I learned a lot by making this book.

another one using all My Digital Studio!

Another by using the ruler and setting at the 6" mark on the down ruler.  How easy is that?  Then print both off and adhere.  Again how easy it made doing this scrapbook.

Months nine and 10 below and I did stamp the giraffe with the birds and the birds in the tree.  But the tree was from the My digital studio stamps. 

And, here we are finally at the last page.  I did a mirror image and then move some things on the second page but kept the center where it was.

Hope you all enjoyed looking at the scrapbook I did for my daughter.  I know I enjoyed doing it and will be using "MY DIGITAL STUDIO" a lot more in the future.  I am planning on getting a computer that does print out 12 X 12 pages though.  I think in the long run it will be worth it.
Thanks so much for looking and please leave a comment!

Thursday, July 29, 2010

Merry Christmas/Greeting Card Kids

This is my for the Mojo Monday Sketch this week and it has been a long time since I played, but I knew it would be a great sketch for this new stamp set, Greeting Card Kids.  I actually used quite a bit of the vanilla smooch spritz to give it the winter look and I took another picture below that shows the wonderful sparkle.  I also used the Frost White Shimmer paint on the scarf and the white edges of the coat and hat which gives it a different kind of shimmer there.  I love this newsprint designer series paper which gives it even more of a Christmas look to me.  I am thinking the little girl is singing as she pulls her Christmas tree home.  The paper colors are very vanilla, basic black and real red.  I used the new Dotted Scallop Ribbon Border punch for the 3 pieces in the center.  Other items used are Teeny Tiny Wishes stamp set, and modern label punch.  Thanks for looking!

Monday, July 26, 2010

Perfect Punches Card # 2

This is card # 2 made with the Perfect Punches Stamp Set.  Actually this card would be a perfect card for another punch card class.  The last one went well and everyone had a blast.  I may have to get 3 more together and have another one.  Anyway, this was inspired by two challenges.  Challenge # 1 was to make 2 or more cards using the same stamp set and that was the Late Night Stampers Challenge.  The other inspiration for this card was the stampin' connection's featured stamper challenge.  This was a case from Debbie Currier's gallery and she does have a remarkable gallery.  Thanks for looking!

All items used were Stampin' Up!
Stamp Set: Perfect punches
Card Stock: Pink Pirouette, Basic Gray, Whisper White, Certainly Celery
Ink: White Craft
Vanilla Smooch Spritz
Perfect polka dots embossing folder
Punches: Extra large flower, 5 petal punch, pinking hearts border, modern label, extra large bird punch.

Sunday, July 25, 2010

Perfect Punches/Stamping 411

The sketch this week for stamping 411 is such a delightful sketch.  It took some real hard thinking, but when I finally decided, it just seemed to fall into place.  Also I am still working on the Late Night Stampers Challenge to make two cards using the same stamp set.  So, again this is card one of two (will be posted tomorrow).  I have seen a lot of cards just using buttons and I had wanted to try it, but still had to add the flowers because the buttons just looked so bare.  But once I was finished, I really liked the final outcome. 

All items used Stampin' Up!
Stamp Set: Perfect Punches
Card Stock: Whisper White, Marina Mist, Rose Red
Classic Ink: Rose Red
Pretty in Pink 1/4" grosgrain ribbon
Large Oval Punch
Punch Border dotted scallop ribbon
Finial Press Embossing Folder
Subtles Buttons
Paper Flowers
vanilla smooch spritz

Saturday, July 24, 2010

In the Morning!

I was so excited about the finished outcome of this card.  I was actually putting together 3 challenges from Christian Paper Crafts into this one card.  Wednesday Case Artist, Bible Verse Thursday, and Fun on Friday.  Wednesday's Case Artist was Janaria and she had such a wonderful gallery, but the card I chose was absolutely beautiful and was basically laid out just like mine.  Hopefully you can see the card here!  Then Bible Verse Thursday was to use a scripture that reflects peace and quiet or what you would do in your daily quiet time with the Lord.  This is the scripture that came to my mind and so I printed it from my computer.  Then we come to Fun on Friday and it was to use polka dots.  Since this wonderful new paper from SU has polka dots on it and I was dying to use it, it worked in quite well with the challenge.  It is called Elegant Soiree and uses the colors Baja Breeze, Soft Suede, Crumb Cake, Very Vanilla and Basic Gray.  For my card I used the Baja Breeze, Soft Suede and Very Vanilla.  The ribbon is actually from last year and is the Soft Suede polka dot turned over to the soft suede side.  I was afraid to use the polka dot side!  Now the flower is a different story.  I actually used the packing paper that comes in the Stampin' Up! shipments.  By using the scallop round punch, I punched out about 8.  I then laid them down in single file and spritzed them with the log cabin smooch spritz which gave them a beautiful color.  Then I put them together and attached a brad to the center, squashed them together and then unfolded to get this wonderful flower.  I also attached a little butterfly which was made using the beautiful wings emboslits die.  I then spritzed the whole card with vanilla smooch spritz.  I tell you it is wonderful stuff and I have gotten very attached to it as you can see in most of my blog posts.  Thanks so much for looking and hope you have a wonderful day!

Friday, July 23, 2010

Workshop Samples

Is this not the cutest little brief case card holder.  We made this at our workshop last night.  I found this video and then decided to do a workshop using this new designer paper called, sunny garden and the On Board Books Briefcase.  This is actually the sample my hostess made tonight and I took a picture before I left.  The hostess gift I gave her were 4 cards and 4 envelopes to put inside of this wonderful little briefcase card holder.  Please check out the video on how to put this together by Glenda Calkins.  Wish I could say it was my idea, but it was definitely fun to do.  It is a wonderful and great use for this On board books Briefcase set.  You can actually make four of these with one package of the On Board books.  Following are the cards I made to go into the card holder.


Supplies used are all Stampin' Up!
On Board Books: Briefcase (Summer Mini)
Stamp Sets: Tiny Tags, Whimsical Words, Punch Potporri (hostess)
Card Stock: Whispser White, Poppy Parade, Pear Pizzazz
Designer Paper: Garden Parade
Punches: 5 petal punch, extra large flower punch, extra large bird punch, jewelry tag medium, Itty bitty shapes punch pack
1/2" pear pizzazz poly stitch ribbon, white taffata
beautiful wings embossing die
Sticky Strip, Glue dots, glue stick

Thanks for looking and have a wonderful day!


Thursday, July 22, 2010

Studio Sketches #2

Here is my second card using studio sketches.  For this card, I received my inspiration from Christian Paper Crafts Tuesday sketch.  What a great sketch they have each week and what wonderful people you meet over there.

With this card, I used the very vanilla for the card base and then the ridinghood red for the second layer.  It is embossed using the perfect polka dots embossing folder.  Once I embossed the red, I then spritzed it with the log cabin smooch spritz (loving that stuff).  I then used some DSP from last years Pawsitively Prints and adhered that piece to the ridinghood red.  Wrapped a piece of the 1/8" early espresso taffeta ribbon around and attached bow to front.  I then attached this to the card base.  Then using the new extra large scallop punch, I punched a piece of early espresso card stock.  Then stamped the image on a piece of very vanilla card stock with early espresso classic ink and punched it out with the 1-3/4" circle punch.  I colored the apples in with the ridinghood red marker and the bowl with the so saffron marker.  I then sponged the edges with the early espresso classic ink.  I attached this circle to the scallop circle and then attached it to the card.  Using the hostess stamp set, because I care, I then stamped the sentiment on the bottom of the DSP using the early espresso classic ink.

The pearls at the top are the new pearls from stampin' up! and I actually used the early espresso marker to color them.  How cool is that?  It will come off, but it does tint them.

Thanks for looking and let me know what you think!

Wednesday, July 21, 2010

Studio Sketches/Stamping 411 Challenge

When I first saw the sketch on Stamping 411, I thought what will I do with that!  But as soon as I decided to use this new stamp set, Studio Sketches, I knew exactly what I would do.  Also is this new lace ribbon fantastic or what?  I am going to love it, but then again, I love stamping in general, so I love it all.  Also the challenge for Late Night Stampers was to create two or more cards using the same stamp set.  Card # 2 coming tomorrow.

Following are the items I used, all stampin' up!:
Stamp Sets: Studio Sketches, Because I Care (sentiment)
Card Stock: Crumb cake (base), Riding Hood Red, Very Vanilla, So Saffron, Early Espresso
Classic Ink: Early Espresso
Markers: Early Espresso, So Saffron, Certainly Celery, Riding Hood Red
Ribbon: Crochet Trim Chantilly 1/2"
Square Lattice Textured impressions embossing folders
Punch: Scallop Trim Border
Smooch Spritz: Log Cabin, Vanilla Shimmer

Thanks for looking!

Tuesday, July 20, 2010

Just Believe

This card turned out so fantastic to me and it was because of two challenges.  One was the sketch from last week at Christian Paper Crafts and the color challenge at our stampin' connection.  It is always good if you have a starting point, and when I saw the sketch from Christian Paper Crafts, I knew this was the it.  The card stock I used here is Regal Rose, Basic Black, and Whisper White.  I actually inked the whole stamp and then took the color off using a paper towel and then applied the regal rose by a marker.  I then stamped the image and actually using the marker made the flower image a little darker.  I ran the basic black through the cuddlebug using the finial press embossing folder from Stampin' Up!  Ran a piece of 1/4" grosgrain whisper white ribbon around the black and then adhered this to the card base.  Stamped the image on the whisper white, then attached it to the regal rose which was cut 1/4" bigger on all sides than the whisper white, and then adhered these two pieces to the basic black.  I then spritzed it with the vanilla smooch spritz.  How great is that.  Thanks so much for looking and have a wonderful day!

Sunday, July 18, 2010

Celebrate

This is a card that I did for a challenge over at Christian Paper Crafts where we were suppose to case one of the members of the design Team.  For this card, I cased "stamptician" (Jennipher Lowery).  She does fabulous work and I love looking at her gallery there.  But, anyway, I actually used some retired items for this card to help get rid of some paper.  If you saw my retired DSP stash, you would think I never used paper.  I am thinking I may have to use more of it, so I will have room for the new!  Sounds like a plan to me. lol 

Some of the items used with this card are:
For the large flower - used the extra large flower punch, and then added the 1-3/8" and 1-1/4" round punch to give a little bit of dimension.  For the smaller flower, I used the 1-1/4" and 1" round punch.  I spritzed both with water to give it a more tattered look.  For the border, I used the pinking hearts border punch.  And for the embossing, I used the birthday embossing folder for the cuddlebug.

Thanks for looking and have a wonderful Sunday!

Saturday, July 17, 2010

Fast and Fabulous

OK, this is the second card that I have used the brayer on.  It was also inspired by the featured stamper challenge on stampin' connection, Michelle Zindorf.  She does beautiful work like this all the time and teaches brayer classes.  One day, I may try to teach a brayer class; in about 10 years. lol  Anyway, for my second time, I don't think I did such a bad job.  Here I used the hostess set Fast and Fabulous, the brayer and the extra large bird punch for the scene.  The branches are the leaves that are punched out with the bird with the leaves cut off.  To see how Michelle did hers check out her tutorial here.  Of course her's is a lot better than mine.

I did not have the stamp set she had, so I changed it out and also used different colors for the background.  Marina Mist and Almost Navy and Night of Navy are the Inks I used.  Paper was marina mist, basic black and whisper white.

Thanks for looking!

Thursday, July 15, 2010

First Christmas Card of the Year

This is my first Christmas card of the year and what inspired it was the sketch last week on Christian Paper Crafts.  As I was going through some of my retired papers from stampin' up!, I saw this retired Christmas Jingle Scrappin kit and knew I was going to use it.  I should make a couple of more because I have the paper and stuff to do it with and boy was it easy.  I used the 1-1/4" and 1-3/8" square punch.  Some of the squares were in the scrappin kit.  Anyway, got any old paper laying around, just cut out some squares and start putting them on paper.  Makes a great card!  Thanks for looking.

Tuesday, July 13, 2010

Greeting Card Kids/School Days

How cute is this?  I knew from the first moment I saw this stamp set in our new catalog that it would be a favorite for me.  And, then when I saw the sketch on StampinupNLStampers for this week challenge, I knew I would be using this new stamp set called Greeting Card Kids.  You will be seeing a lot more of them. 

With this card, I used the Newsprint DSP which is in the Summer Mini and I think also the regular catalog.  I actually started out with the very vanilla card stock.  Then I attached a piece of pear pizzaz to it which I also used the perfect polka dots embossing folder.  Then I ran a piece of basic black through with the top note die.  I then cut a piece of the Newsprint DSP 3" X 3-3/4" and adhered to the basic black after I used the corner rounder punch to round the ends.  I cut a 1" strip of very vanilla and ran it through using the square lattice embossing folder.  I then added the black brads and then attached to the pear pizzaz.  On top of the left side of the card, I attached the top note piece.  I then stamped the image on a piece of very vanilla card stock with basic black classic ink.  Using the Stampin' Up! markers I then colored the image in.  Markers used were the pear pizzaz, Sahara sand, so saffron, poppy parade (apple) and used the blush blossom for the skin color.  I then adhered that to a basic black piece and attached to card.  I then spritzed it all with the Vanilla Shimmer Smooch Spritz.  Following is a close up of the coloring and the stamped image and you can see the shimmer on the card a little better.  Hope you like it and thanks for stopping by.

Monday, July 12, 2010

Vintage Vogue/Stamping 411

I thought I would use some of the new in colors.  A little bright don't you think, but I am loving these colors.  Anyway, this was inspired by the stamping 411 sketch.  A wonderful sketch, but I am not sure I did it justice.  I do love the new basic pearls by stampin up though and had to use them.  The in colors that I used are Pear Pizzaz, Poppy Parade and Concord Crush.  I even made the Designer paper by using the stamp set Vintage Vogue and using the same in colors (classic ink)that I used for the paper.  Other items used were the beautiful wings embosslit die, itty bitty buttons and itty bitty shapes punch pack.  Whisper white 1/4" grosgrain ribbon and the sentiment came from the teeny tiny wishes stamp set.

Thanks for looking and please let me know what you think!

Sunday, July 11, 2010

Forgive/Scripture Word challenge #14

I really am enjoying these challenges that Patter offers on her site "Triple the Scraps."  She is a very talented person and a very talented writer.  You need to check out her page she did for the word "Forgive."  She has a wonderful devotion on it.  You can see it by clicking here

When I was doing my word challenge today, I thought how much grace our Father in heaven shows us everyday by forgiving us of our many sins and how little grace we show other individuals when they wrong us.  I realized just how much my daughter was growing in Christ yesterday when she said something to me about something I had said in regards to "if this does not happen then I am not going to do this."  I looked at her and said, "I don't know why I always say that, because God always deals with me and I wind up having to ask forgiveness for being so unforgiving.  That is why I used the first verse on this page. 

"And whenever you stand praying, if you have anything against anyone, forgive him, that your Father in heaven may also forgive you your trespasses." Mark 11:25

I pray that God always opens my eyes to the sin in my life so that I can always honor Him and glorify Him in all I do.  He is my Saviour and all I need to live a life of fulfillment.  Which leads to my second verse.

"If we confess our sins, He is faithful and just to forgive us our sins and to cleanse us from all unrighteousness." 1 John 1:9

He will cleanse us!  How great is that?  But not only will He cleanse us, but He will forgive us our sins.  I don't know about you, but I need cleansing everyday.  Thanks you Lord for your wonderful forgiveness.

For this page I used the My Digital Studio by Stampin' Up!  Thanks for looking!

Saturday, July 10, 2010

Brayering/upsy daisy

My first attempt at brayering and I think it turned out all right.  I almost put the bunny over the cliff, but he is still on the edge, so I guess he will be OK. lol  Anyway, I got my inspiration from the talented brayer stamper Michelle Zindorf.  She was the featured stamper this week at stampin' connection.  Her rendition is a lot better than mine, but she actually does classes for using a brayer.  To see the card I cased and the instructions on how to do this, go here

The colors and supplies I used in mine are:
Card Stock: Cajun Craze, Old Olive, Whisper white
Classic Ink: Bashful Blue, Marina Mist, Night of Navy (used on the brayer), Crumb Cake (sponging the cliff) Old Olive, Versamark
Markers: Cajun Craze, Crumb Cake, Versamark
White Gel pen
sponges
Clear embossing powder
Heat gun
Corner rounder punch

I am sure I missed something, but that is the most of it.  Thanks for looking and have a great day!

Friday, July 9, 2010

Newsprint

Well, I am still not sure I really like this card, but it does work.  I did it for the sketch last week over at Christian Paper Crafts.  Wonderful sketch, just don't know if I did it justice. 

I did want to use the Newsprint and when I saw this sketch, I thought it would work great for the this paper.  But now I wish I had used the Newsprint DSP for the background and the black with the flower in the front.  I may try that at a later time.

Anyway, I used a standard A4 card cut from Whisper White Card stock and then took a basic black piece of card stock cut at 4" X 5 1/4" and ran it through the cuttlebug using the finial press embossing folder from SU.  I then took the taffeta ribbon and adhered to the basic black.  Then tied a bow and adhered to the ribbon.  I cut the newsprint at 2 X 2 and then scrunched up a little and then adhered to the basic black.  Using the whisper white card stock, I punched out 2 1" circles and 2 3/4" circles.  Then distressed the card stock enough to separate them into a total of 8 pieces.  Scrunched them up and then unscrunched and sponged them with red riding hood ink.  I then placed them on top of each other starting with the 4 large pieces and then the four small pieces.  I punched a hole in the center and put a black brad through.  I then scrunched them up again and unscrunched while building the flower.  I then used the silver smooch spritz and spritzed the whole card ribbon and all.

Thanks so much for looking!  All products are Stampin' Up!